- Introduction
- Check prerequisite
- Create a Acuity Controller Account
- Stake your ACUs
- Payout rewards
- Stop nominating
- Rebonding before the end of the unbonding period
Introduction
The Genesis block of the Acuity network was launched on September 3, 2020, as a Proof of Authority (PoA) network.
The 17th October 2020 Proof of Stake (PoS) has begun and is ready to receive your nominations for their four validators, which you can find under the following addresses:
5D7b2wg76R3pwUYWkxwUL7Xq5Sy5aCmpK5vRm6YZ89AvzVkV
5F9H413D3yDKDzN1cQpXNtYx33s4kJjv8DZnqt84xJKSSHkt
5EviQu53jsfKGXTvqFaWQEgcjykWodBFCwHN1rKYBrjfULsS
5EKypbhUk7zhmavdeYnTfXUViTrG47zFKg3yjbArbbxDCGR8
Those four validators are managed by Jonathan Brown (@bluedroplet) the Acuity founder and lead developper.
Those validators are charge free with 0% commission fee.
In this guide you will learn how to:
- check prerequisite
- create an Acuity Controller Account
- stake your ACU tokens
- payout rewards
- stop nominating
- rebonding before the end of the unbonding period
Check prerequisite
Polkadot.js Browser Extension
Since it is recommended by Acuity for most users to use the Polkadot.js Browser Extension to create their addresses, we are focusing on this method.
Make sure to install the Polkadot.js Browser Extension before you get started. You can download the extension for Chrome/Brave and FireFox.
Acuity Account
You also need an active account on the Acuity network and the corresponding mnemonic seed or backup JSON file to access this account. This account will be call your “Stash account” in this guide.
In order to start staking you need ACU tokens on your “Stash Account”. You can buy ACU on Stex Exchange or on the Acuity Discord OTC channel. If you have unclaimed ACU and want to claim them you can follow the Claiming ACU with MEW/Metamask video guide.
Create a Acuity Controller Account
In order to successfully bond your funds and nominate your validator set, you need a separate account, namely your “Controller Account”. You will perform everyday staking operations like changing validators or claiming rewards using this account.
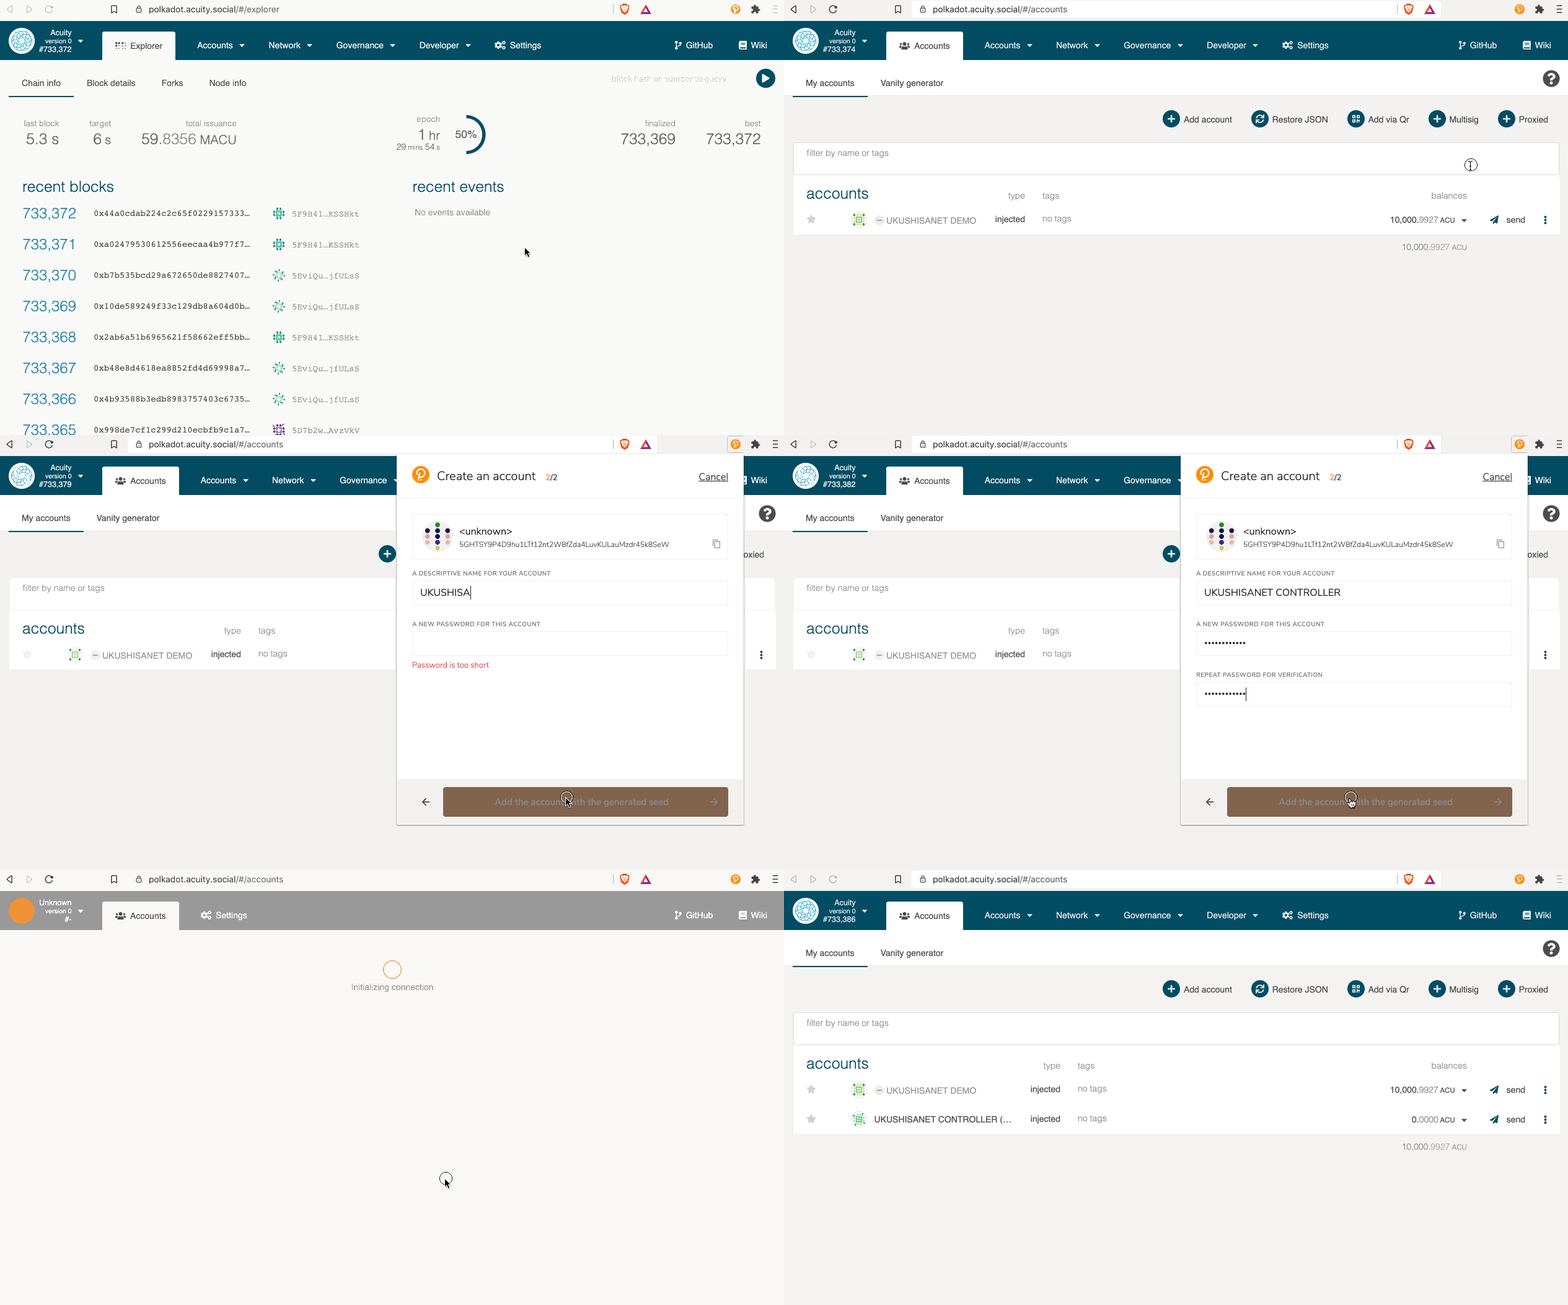
- To create your “Controller Account”, connect to Acuity Polkadot-JS Apps and use the Polkadot.js Browser Extension. Click the plus icon in the top right corner. Then click “Create new account (root or derived)”. Now you have two options:
- derive the new account from your existing account: it will be accessible with the same seed (mnemonic phrase) of the account it was derived from
- create a new account with a new seed: the new account will be independent from the first one and have a separate seed (mnemonic phrase)
We prefer the second option, because we want to have independent keys, which is why we have to uncheck the “Derive new account from existing” box at the top. Then, click “Create account from new seed”.
-
Write down your mnemonic seed phrase and securely store it. Whoever has access to the mnemonic seed also has access to your funds! Check the box on the bottom and click “Next step”.
- Choose a descriptive name for your Controller account as well as a strong password. Then click “Add the account with the generated seed”.

Congratulations, you successfully created your second Acuity account! You will also find this account under the Accounts menu.
Stake your ACUs
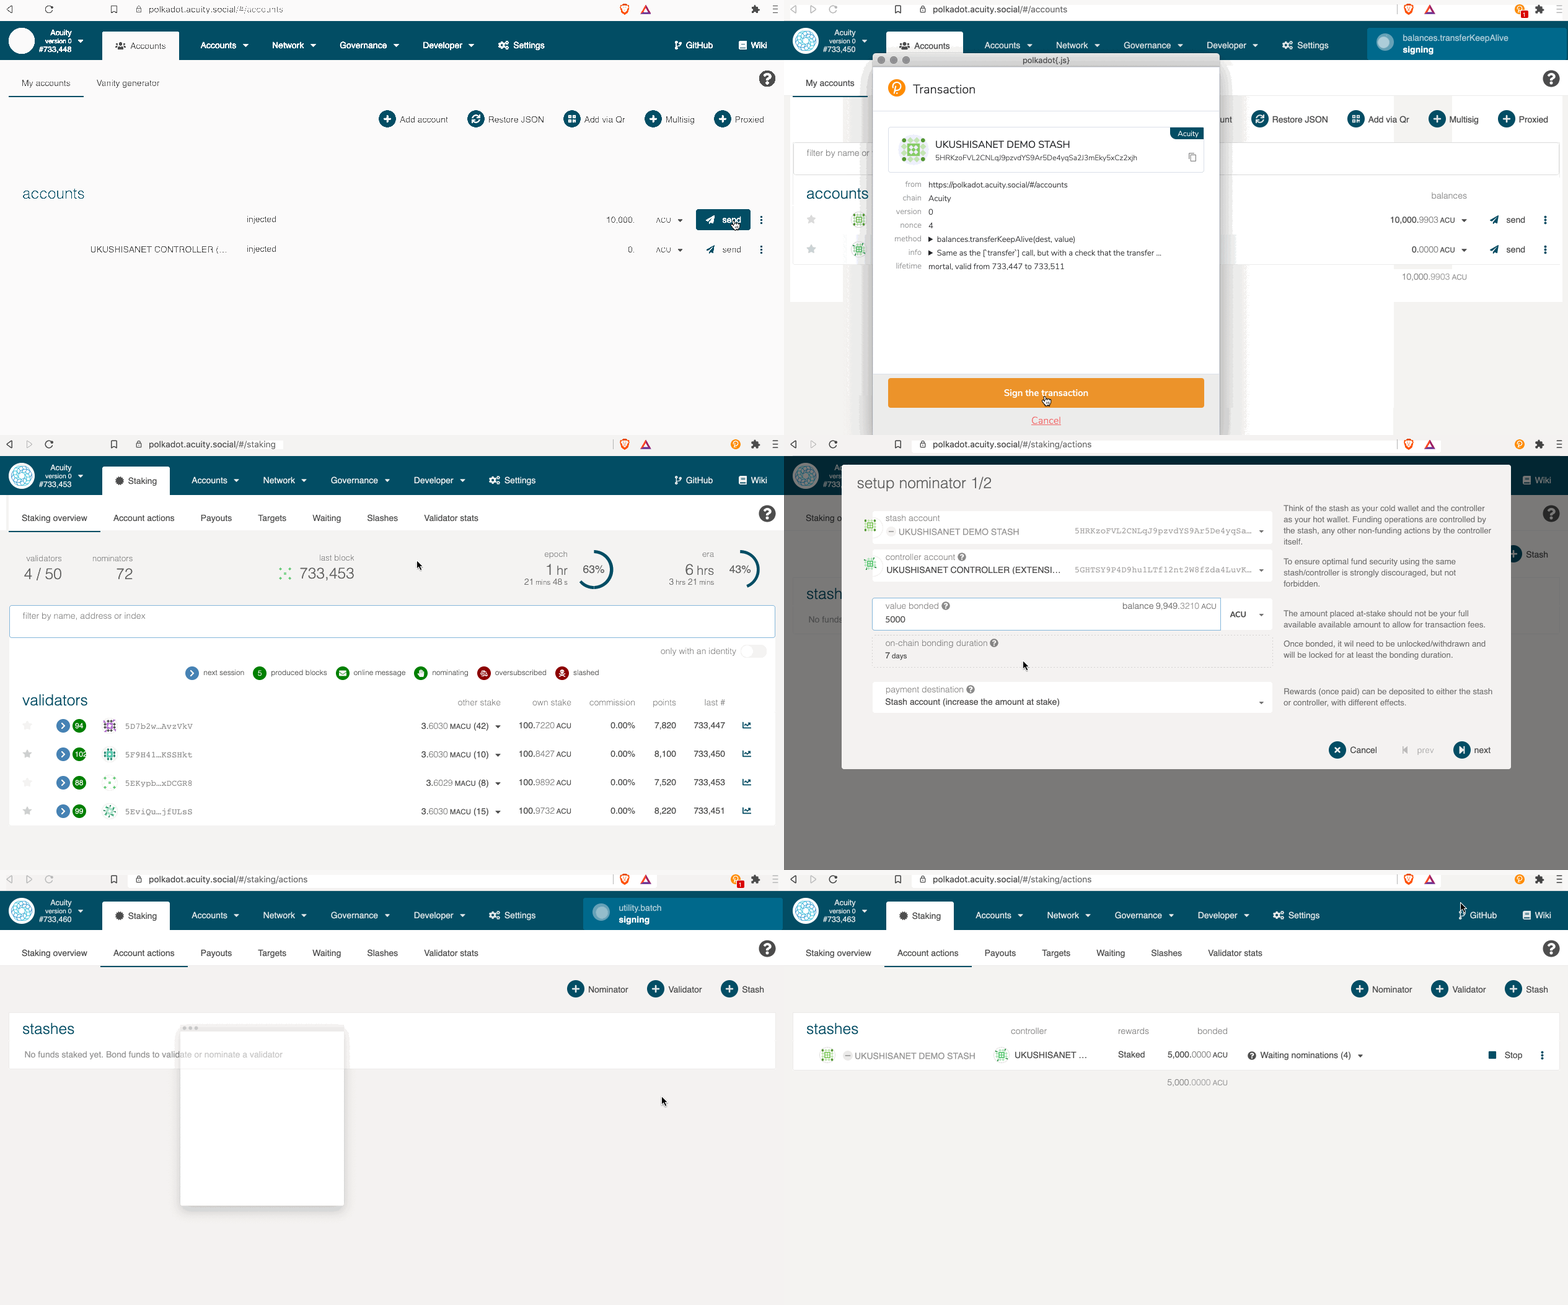
Before starting the Nomination process, send some funds from your “Stash Account” to your “Controller Account” in order to cover transactions fees (2–3 ACUs should be plenty).
-
The staking menu
To start the staking process, click “Staking“ in the top menu bar. On the top you will find different tabs with different information and actions related to your staking operations. Click “Account actions” in order to start the nomination process.
-
Define your accounts
Now click the “+ Nominator” button.
-
Bond your ACUs
You need to choose distinct account for “stash account” and “controller account” from the previuosly created accounts.
Choose the amount of ACUs you want to use for staking under “value bonded”.
Choose a destination account for your rewards under “payment destination”. Then click “next” to bond your token.
-
Choose validators
Simply select the validators of your choice by clicking on them in the left box, make sure to have the auto-selection turned off by switching the button below “nominated accounts”. You can unselect them from the right box by clicking on them again. Alternatively, you can also use the search bar in the top to look for specific validators by name or address. Then click “Bond & Nominate”.
Acuity founder validator addresses:
 5D7b2wg76R3pwUYWkxwUL7Xq5Sy5aCmpK5vRm6YZ89AvzVkV
 5F9H413D3yDKDzN1cQpXNtYx33s4kJjv8DZnqt84xJKSSHkt
 5EviQu53jsfKGXTvqFaWQEgcjykWodBFCwHN1rKYBrjfULsS
 5EKypbhUk7zhmavdeYnTfXUViTrG47zFKg3yjbArbbxDCGR8
Please note that you cannot specify the amount delegated to a particular validator. Your bonded ACUs will be spread out among the validators you selected.
-
Bond & Nominate
Click “Sign & Submit” in order to conclude your nomination.

Congratulations, your are now a Nominator on the Acuity network!
Payout rewards
To claim rewards on Acuity Polkadot-JS Apps, you will need to be in the “Payouts” tab underneath “Staking”, which will list all the pending payouts for your stashes.
To then claim your reward, select the “Payout all” button. This will prompt you to select your stash accounts for payout.
Once you are done with payout, another screen will appear asking for you to sign and submit the transaction, and that is all there is to claiming rewards.
Stop nominating
The following describes how to stop nominating and retrieve your tokens. Please note that Acuity network have a delayed exit period, called the unbonding period, which serves as a cooldown. You will not be able to transfer your tokens before this period has elapsed.
Step 1: Stop Nominating
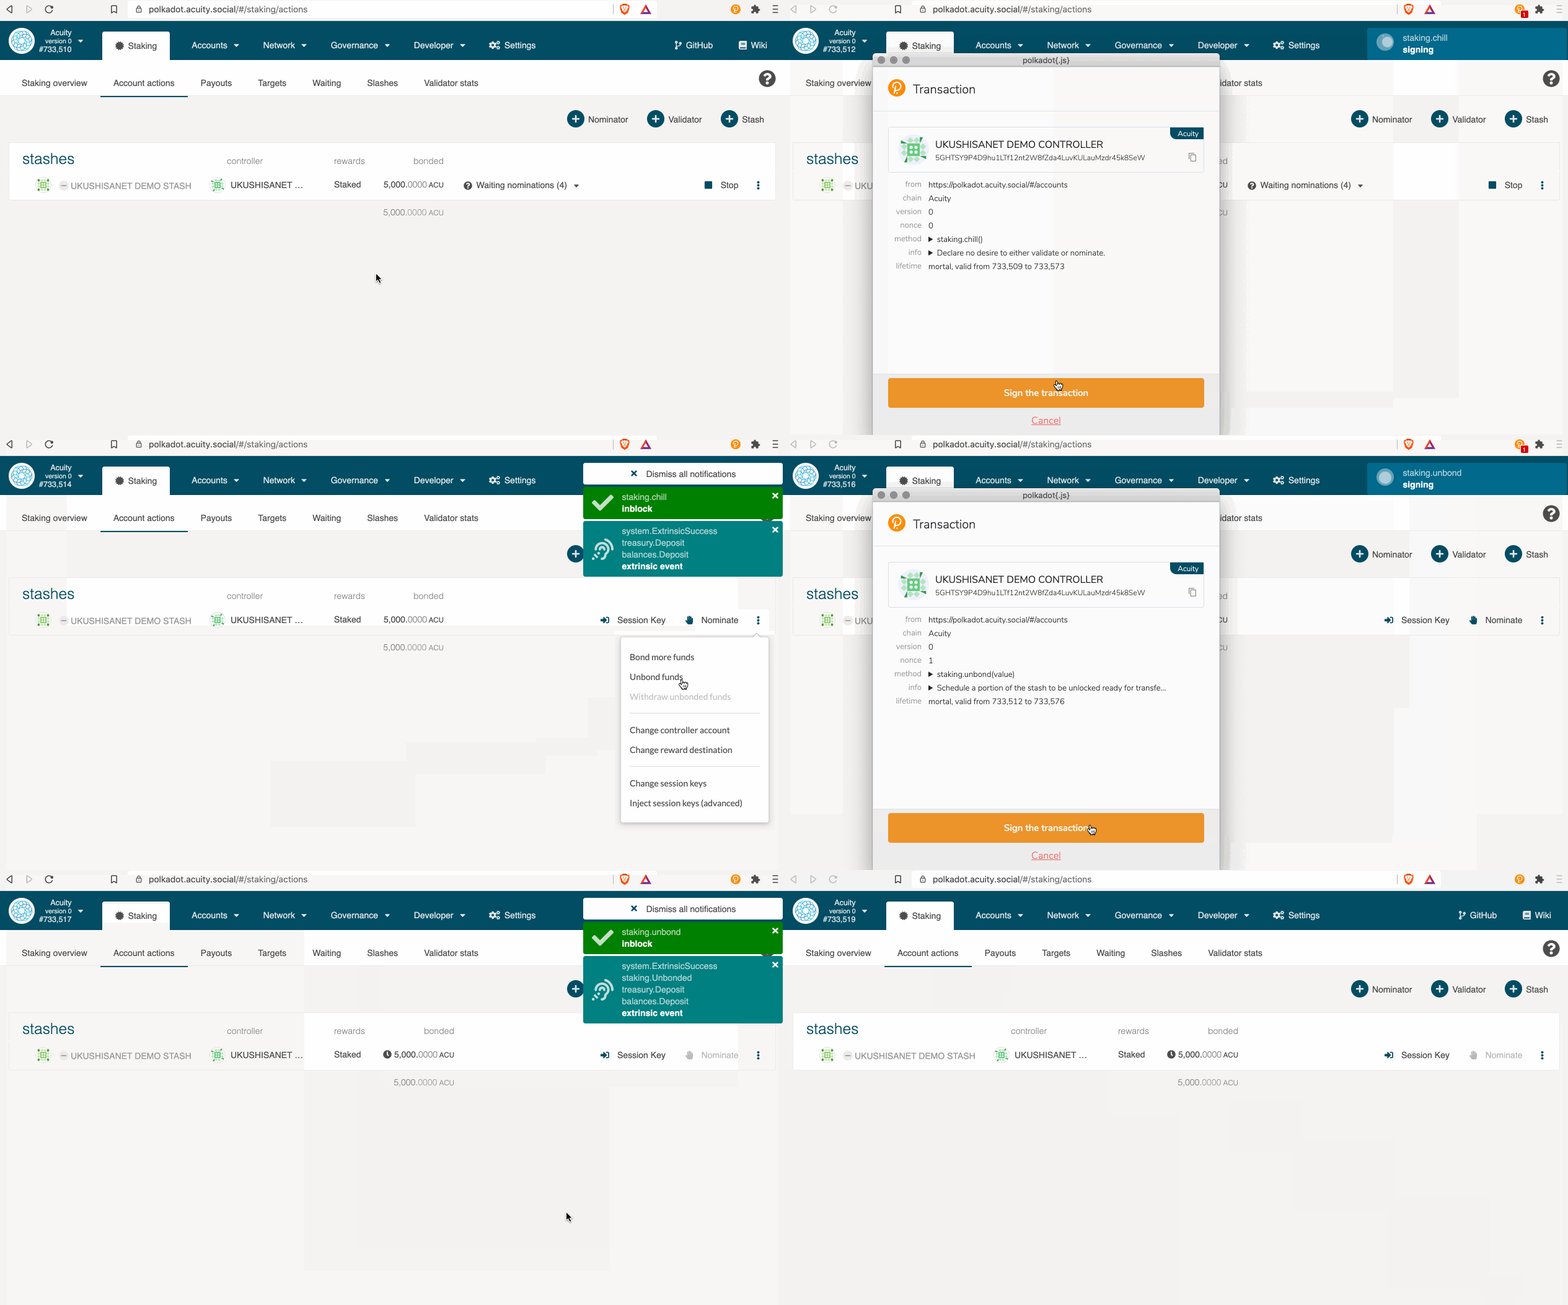
On the Acuity Polkadot-JS Apps navigate to the “Staking” tab. On this tab click on the “Account Actions” tab at the top of the screen.
Here, click “Stop” on an account you’re staking with and would like to free the funds for.
After you confirm this transaction, your tokens will remain bonded. This means they stay ready to be distributed among nominees again. To actually withdraw them, you need to unbond.
Step 2: Unbonding an amount
To unbond the amount, click the little gear icon next to the account you want to unbond money for, and select “Unbond funds”.
Select the amount you wish to unbond and click “Unbond”, then confirm the transaction.
If successful, your balance will show as “unbonding” with an indicator of how many more blocks remain until the amount is fully unlocked.
This unbonding duration period is 7 days on the Acuity network.
Once this process is complete, you will have to issue another, final transaction: Withdraw Unbonded. Then, your transferrable balance will increase by the amount of tokens you’ve just fully unbonded.

Rebonding before the end of the unbonding period
If you want to rebond your tokens before the unbonding period is over you can do this by issuing a rebond extrinsic. This allows you to bond your tokens that are still locked without waiting until the end of the unbonding period.
In order to do this you will need to issue an extrinsic manually from Acuity Polkadot-JS Apps.
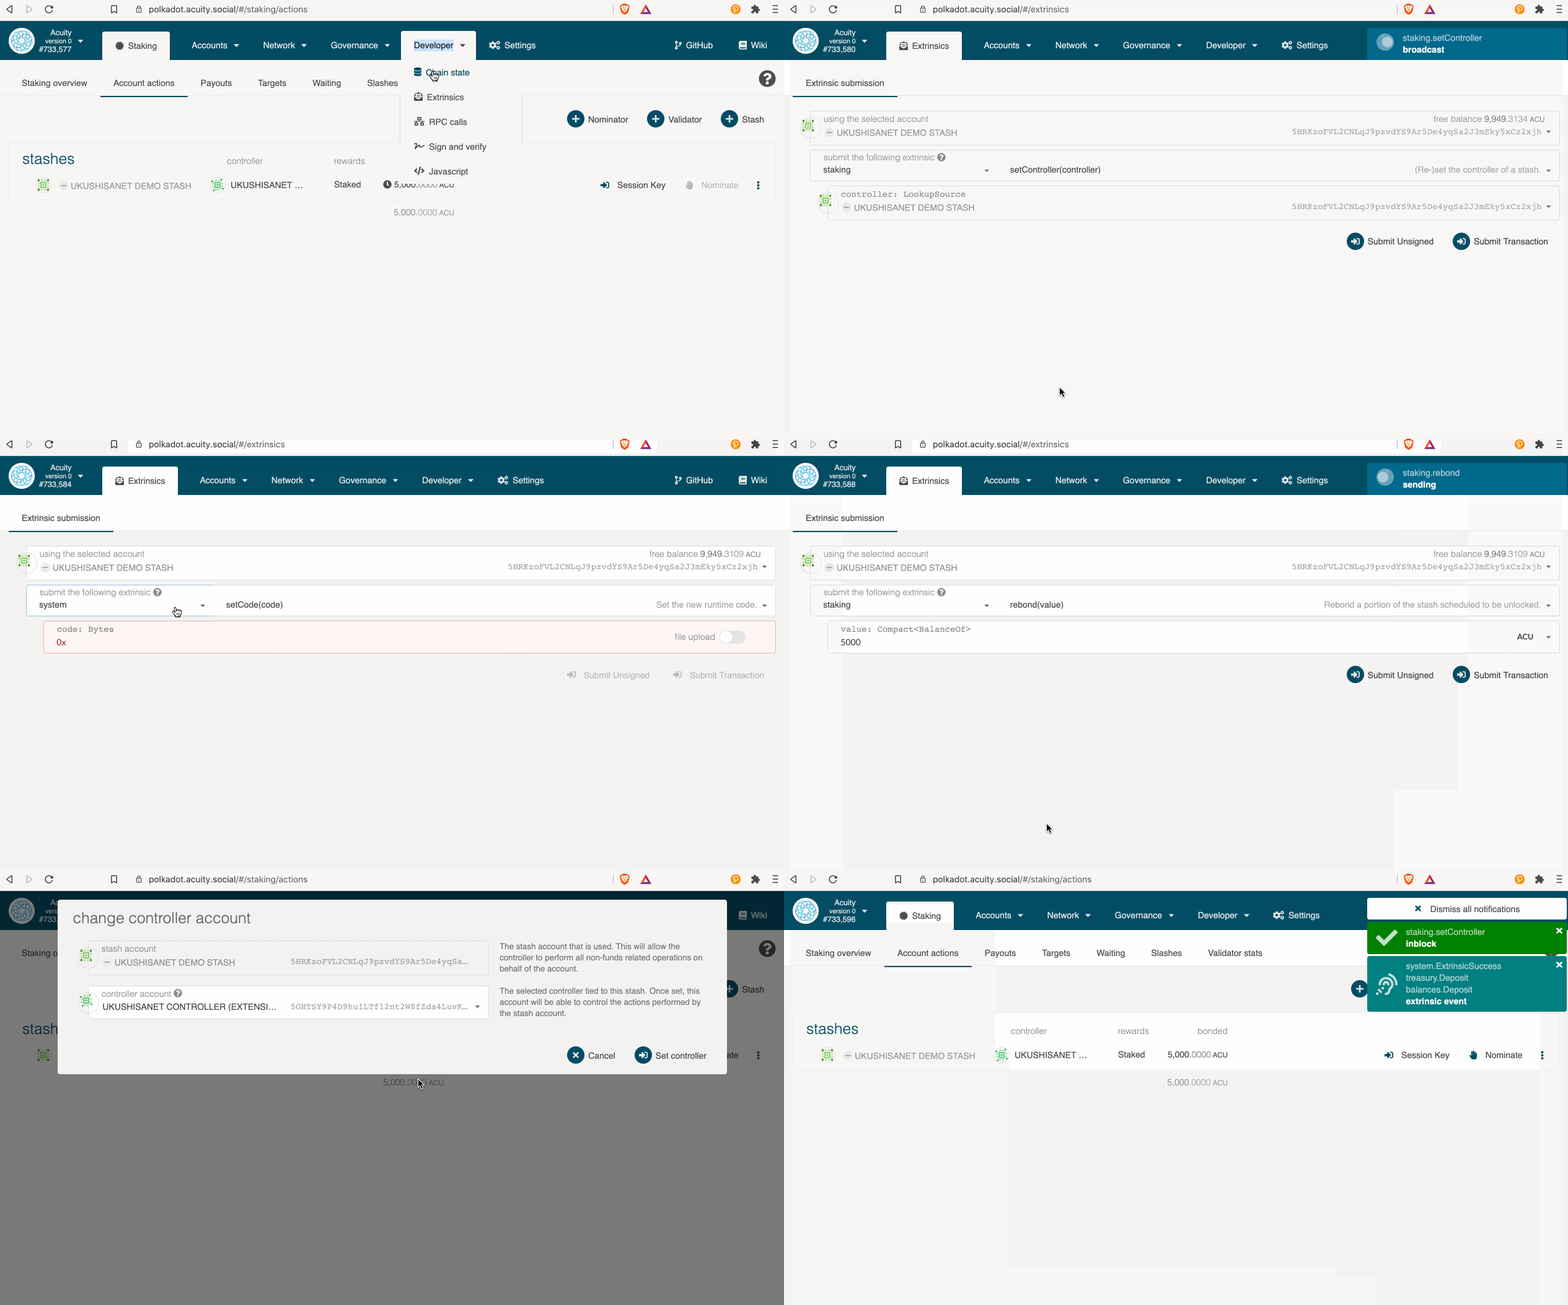
Go to the “Extrinsics” option that’s located in the “Developer” dropdown in the top menu.
Before rebonding, you need to change your controller account and set it to your stash account.
Select the “staking” pallet and the “setController” extrinsic. Select your stash account in both “selected account” and “controller” field. Then click “Submit Transaction”.
Select the “staking” pallet and the “rebond” extrinsic. Select your stash account. Enter the amount of tokens that are currently locked in unbonding that you want to rebond. Then click “Submit Transaction”.
Confirm the transaction in the next pop-up. Once the transaction is included in the next block your tokens will be rebonded again and you can start staking with them.
Finally you can set your controller account back again from the “Staking” tab. On this tab click on the “Account Actions” tab at the top of the screen.
Here, click the little gear icon next to the account you want to change the controller, and select “Change controller account”. After you confirm this transaction, your controller account is set back to the good one and you can nominate again with your re-bond tokens.

In case you have any questions, need more assistance or simply want to chat, always feel free to reach out to us via #Staking channel on Acuity Discord to discuss!